Dust Collection Systems for Woodshops: From Garage to Pro
Dust Collection Systems is one of the most important aspects of a safe, healthy, and efficient woodworking shop. Whether you’re working in a garage corner or running a multi-person production facility, the right dust collection system will protect your lungs, improve your finishes, and keep your shop clean.
Woodshops come in all shapes and sizes, and so do dust collection needs. This guide breaks down the four main types of dust collection setups based on shop size and dust generation:
- Level 1: Garage Workshop (or smaller) Using a Shop-Vac
- Level 2: Compact Shop with Dust Collector
- Level 3: Small, Dedicated Shop with Fixed Ductwork
- Level 4: Professional Multi-Person Shop with Industrial Cyclone Systems
Level 1: Dust Collection for a Garage-Corner Workshop
If your workshop is a corner of the garage with a few handheld tools, you can still control dust effectively. The key is choosing a setup that’s compact, easy to move, and effective at capturing dust at the source.
Quick Setup at a Glance
Space: Garage corner or small workspace

Typical Tools:
- Drill/driver (often cordless)
- Circular saw
- Handheld router
- Orbital sander (generates the most dust — connect it to a vacuum)
- You can make virtually anything with these 4 tools
Dust Collection System:
- Shop-vac or small dust extractor
- HEPA-style filter + vacuum bags
- Cyclone separator to catch chips before they clog your filter
- Good-quality dust mask or respirator
Why This Setup Works
A shop-vac style system is high-pressure, low-volume — perfect for handheld tools with short hose runs. It can handle sanding dust and small chips but will clog quickly without a separator. A powerful shop-vac typically produces ~150–200 CFM under real working conditions — enough for small table saws or a router table on short, tight hose runs, but not a substitute for a properly sized dust collector for larger stationary tools. (Actual CFM varies with model, filter state, and hose size.) Pro tip: Upgrade your shop-vac with a HEPA-material filter and matching bags. It won’t be a certified “True HEPA” system, but it will catch about 99% of particles 0.3 microns and larger from the air that passes through it. You’ll still need to wear a mask, because airborne dust can linger for hours.
Next Up: Get a Cyclone Separator
Attaching a cyclone separator between the tool and your vacuum will:
- Trap 99% of heavy chips before they hit the filter
- Prevent clogging
- Maintain suction
- Extend the life of your HEPA bags (which aren’t cheap)
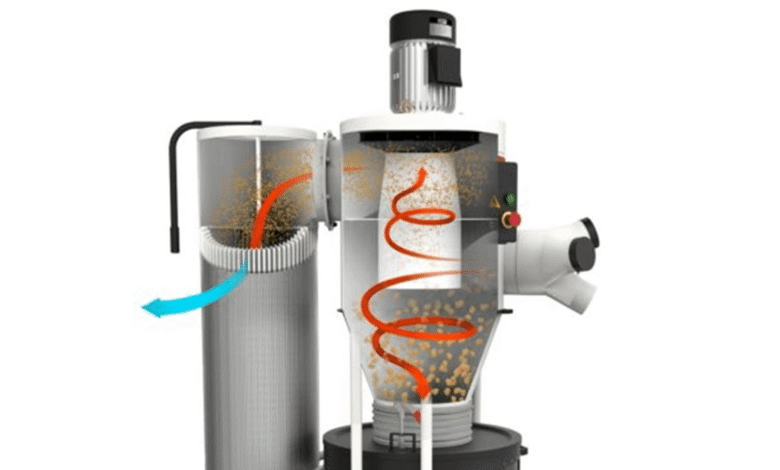
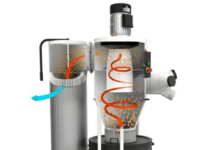
How it works: Dust-laden air enters the cyclone chamber and spins downward. Heavy debris is flung outward and falls into a bucket, while fine dust travels up through the center to your filter or bag.
Deep Dive: HEPA vs. HEPA-like
(For those who want the science)
| Filter type | Min. efficiency @ 0.3 µm | Certified HEPA? | Why it matters |
|---|---|---|---|
| True HEPA | ≥ 99.97% | ✅ | Meets DOE/industry HEPA standard at the toughest particle size to capture |
| HEPA-type / HEPA-like | Varies | ❌ | Often unverified; may underperform on the smallest particles |
| Standard shop filter | ~90–95% (larger particles) | ❌ | Fine dust escapes; OK for chips and coarse dust |

Health & Safety
Even with HEPA filtration, no system catches 100% of airborne dust. Always wear a mask when cutting or sanding — and keep it on for a while afterward.
Mask options:
- Basic dust mask – limited fine dust protection
- P100 respirator – filters 99.97% of airborne particles; best choice for woodworking
- Organic vapor cartridge respirator – for spray finishing
Extra Tips for a Cleaner Garage Shop
- Ambient air filter: Commercial or DIY. Set it on a timer to run for an hour or two after you leave.
- Air compressor: Great for cleaning tool interiors — but do it outside to avoid blasting dust back into your workspace. A leaf blower works for corners too.
- Vacuum cart: Build a rolling stand to hold your shop-vac, cyclone, and accessories together. Saves your back and keeps everything tidy.
Most woodworkers with this setup buy their dust collection gear from big-box or hardware stores. But understanding these basics now will make it much easier to upgrade to larger systems later.
(This video is for an air compressor, obviously. If I were making a cart for my dust system, I’d keep it open on 4 sides for ventilation. All that clean air has to go somewhere; plus you don’t want to overheat your machine.)
Level 2: Compact Shop with Dust Collector
This level covers small but serious workshops, often in a garage or outbuilding, when you start adding larger stationary tools like a table saw or router table.
Typical Setup and Tools
- Space: 400 to 800 sq ft (2- to 3-car garage)
- Tools: Table saw, router table, sometimes a planer &/or jointer. Not all at once. But all of which generate a lot of chips & dust.
The key thing here is that it is a small shop, usually with one person working on one machine at a time, and nothing is very far away from anything else. - Workflow: Mobile tools on carts or bases, with a central assembly table; tools often moved depending on project needs
Dust Collection System
At this stage, a dust collector like the Laguna B|Flux Dust Collector is a good investment. This is a solid choice for an entry-level, 1-stage dust collector (no cyclone separator), 1 HP motor, with a “1-micron” canister filter (which actually provides filtration of 99.97% of particles between 0.2 and 2 microns).
Because it has no cyclone, it has a footprint of only 29″ x 14.8″. Chips are deposited in a 28-gallon bag. There’s a hand crank to clear the filter.
It is rated for 650 Cubic Feet per Minute (CFM) when the reading is taken at the single 4″ inlet port. That number goes down to 550 CFM when the reading is taken at the tool (saw, router) after the hose connection. (A 15% reduction.)

If you have the space, the Laguna C|Flux:1 Dust Collector includes a cyclone separator and a more powerful motor generating twice the airflow (at more than twice the floor space, and almost three times the price).
- Footprint: 42″ x 25″
- Filter: 1 Micron (D|Flux, same deal, filters 99.97% of particles between 0.2 and 2 microns) or HEPA (P|Flux)
- Motor: 1.5 HP / 110V
- Port: 6″ Main Inlet; 2 x 4″ Splitter
- Inlet CFM: 1314 CFM Maximum Air Flow
- “Shop Setting” Air Flow (measured at the tool): 900 CFM — a 31.5% reduction
- Drum Capacity: 25 Gallon
- Decibel Rating @ 9.8 feet: 82 dB (C|Flux) or 70 dB (P|Flux)
- Remote Control
This is how Laguna explains the difference between the two:
The B|Flux dust collector is designed for direct hose connections to individual machines, although many users have small ducted systems for a few machines. We recommend dust collectors with higher CFM ratings like our Cflux and Pflux series machines for ducted systems.

Laguna also makes an Air Filtration Unit designed to recycle all of the air in a 20x20x8 ft. space up to 22 times per hour at its highest speed. 1 micron filter, 3 speeds, on a timer, with remote control.
Calculating Minimum CFM Requirement
To get effective dust collection in your workshop, it’s essential to match the airflow capacity of your dust collector (measured in CFM—cubic feet per minute) with the minimum requirements of each tool. Undersized systems can leave fine dust in the air and clog your hoses, while oversized systems waste energy (and $$). Use the table below to check the CFM needs of common woodworking machines and make sure your setup is up to the task.
| Tool | Minimum CFM Required |
|---|---|
| Jet 722130 JWP-13BT 13″ Planer with Helical Style Head | 500 CFM |
| JET Black 8″ Helical-Head Jointer, 2 HP, 1PH 230V | 400 CFM |
| Miter Saw – Often comes with its own small collector | 350 CFM |
| 4′ x 8′ Router Table – estimate | 180 CFM |
| SawStop CTS-120A60 Compact Table Saw | 170 CFM |
The smaller Laguna B|Flux can handle even a planer, as long as you’re only using one tool at a time.
If you’re running a jointer and a planer in the same session; you don’t want to swap out connections over & over — upgrade to a C|Flux.
Remember, the only reason we said, “Get a cyclone dust separator,” was because we were talking about a shop vac system with HEPA-type vacuum bags, which are expensive. You can buy five reusable 28-gallon B|Flux bags for the price of two itty-bitty (not reusable) HEPA shop vac bags.
The Noise Factor
You can also upgrade to a Laguna P|Flux: 1 with HEPA filtration, which we already talked about, and sound-proofing around the filter. That brings the decibel rating down from 82 dB (at 9.8 feet) to 70 dB.
Decibels are logarithmic, like the Richter scale for earthquakes. Going from 82 to 70 dB might not sound like a lot, but because the number is logarithmic:
- Every increase of 10 dB means the sound is 10× more intense.
- However, our ears perceive a 10 dB change as “twice as loud” or “half as loud.”
- If a sound goes from 82 dB (C|Flux) to 70 dB (P|Flux) at the same distance (9.8 feet), that’s a 12 dB reduction.
- A 10 dB drop is perceived as about half as loud.
- So a 12 dB drop is even less than half as loud — very noticeable.
- 82 dB might be like a loud vacuum cleaner. (Shop-vacs typically clock in ~85 dB.)
- 70 dB is more like normal conversation or a dishwasher in the next room.
So, yes, big difference.
For the record, the smaller 1HP B|Flux has a decibel rating of 76 dB.
Ports & Ducting Strategy
Laguna’s P|Flux: 1 and C|Flux: 1 cyclone dust collectors feature a 6″ main inlet with a Y-fitting that splits into two 4″ ports.
At this stage in your shop’s growth, you can keep things simple: connect your tools with 4″ flexible hose, just like you would with the smaller B|Flux unit. Since you’re typically running one tool at a time, there’s no need for a full ducting system yet. Just position the dust collector near the tool in use and run a short length of hose.
That said, some setups benefit from short duct runs—especially when you’re routing hose to a stationary machine. In those cases, maintain 6″ ducting as far as possible before reducing down to the final few feet of 4″ hose. The goal is to keep that high-volume airflow moving efficiently between your machine and collector.
Whenever you install ductwork—whether it’s a full system or just a short segment—stick with 6″ diameter pipe as long as you can.
Why Duct Size Matters
When it comes to airflow, duct diameter isn’t just a detail—it’s everything.
* A 4″ port (2″ radius) offers \~12.6 in² of area.
* A 6″ port (3″ radius) offers \~28.3 in²—more than double.
Dust collectors are not shop vacs. They’re designed as High-Volume, Low-Pressure (HVLP) systems. Reducing the duct size chokes off that volume—and with it, your dust collection performance.
Running 4″ ductwork straight from the dust collector to the machine can easily cut your airflow in half, even if you’re using smooth metal or PVC. That’s why even with Laguna’s factory setup—just 4–5 feet of 4″ flex-hose at the end—you see a drop from 1314 CFM to around 900 CFM.
Now imagine connecting 15 feet of 4″ flex hose right at the collector’s port. That’s a recipe for clogs, poor suction, and regret. Don’t do that.
Bottom line: Maintain 6″ ducting for as long as possible before stepping down. That larger diameter keeps airflow high, suction strong, and your system running like it should.
| Duct Setup | Approx. Airflow (CFM) | Notes |
|---|---|---|
| 6″ inlet, short 4–5 ft 4″ flex hose | ~900 CFM | Typical drop from ~1314 CFM; factory setup |
| 6″ duct maintained up to tool | ~1200–1314 CFM | Best-case scenario; minimal restriction |
| 15 ft of 4″ flex hose at collector port | < 700 CFM | Major airflow loss; avoid this setup |
| 4″ duct throughout system | 600–800 CFM | System severely restricted; not ideal for cyclone collectors |
*Actual performance will vary based on system design, fittings, and filters.
Other Considerations
- Flexible hose is convenient but causes turbulence that reduces suction.
- If your tools are far from the collector, or you start running multiple tools simultaneously, consider planning fixed ductwork (usually necessary at Level 3).
Matt from Voeltner Woodworking makes a rolling shop cart for his jointer and his planer. A setup like this can be rolled right next to the dust collector for maximum suction.
Level 3: The Small, Dedicated Shop with Fixed Ducting
When your shop reaches about 1,000 to 1,500 sq ft and your workflow involves multiple zones—milling, CNC, assembly, finishing—you’ll almost certainly need fixed dust collection system ductwork.
Typical Setup and Tools
- Space: 1,000 to 1,500 sq ft
- Tools: Table saw, jointer, planer, CNC router, edge bander, bandsaw, drum sander
- Workflow: Dedicated zones for milling, CNC, assembly, finishing
Dust Collection System
For larger shops with multiple tools, you might consider a larger dust collector, like the Laguna C|Flux2 or Laguna P|Flux 2.
- Footprint: 48″ x 28″
- Filter: 1 Micron (C|Flux) or HEPA (P|Flux)
- Motor: 2 HP / 220V only
- Port: 8″ Main Inlet; 2 x 4″ Splitter
- Inlet CFM: 1740
- Drum Capacity: 46 Gallon
- Decibel Rating @ 9.8 feet: 88 dB (C|Flux) or 76 dB (P|Flux)

Your dust collector is completely stationary in this setup, connected to tools through rigid ductwork, with blast gates controlling airflow to each branch.
This setup allows:
- Multiple tools connected without moving equipment
- Maximum suction efficiency with minimal airflow loss
- Cleaner air and better dust capture throughout the shop
Collector Specs
- Two-stage cyclone systems with HEPA-rated canister filters are ideal
- Overhead or wall-mounted ducting helps keep floors clear
- Keep your ductwork 6″ or even 8″ in diameter until you get close the the tools
We don’t usually post other people’s videos, but Matt’s shop is not ducted. We needed a ducting demo, and this guy gets it right. Two thumbs up!
Best Practices
- Use rigid ducting to reduce turbulence and static pressure loss
- Use gentle 45° elbows and Y-fittings instead of sharp 90° bends
- Install blast gates at every branch for efficient airflow management
- Position the dust collector near high-demand tools to minimize duct length
Check out the xTool Desktop Smoke Purifier for the xTool F1 Portable Laser Engraver at around 7:45. Lasers need air purification too!
Level 4: The Professional Multi-Person Shop
At 2,000 to 3,000+ sq ft, your shop supports multiple employees, production workflows, and often a separate finishing area.
Typical Setup and Tools
- Space: 2,000 to 3,000+ sq ft
- Tools: Multiple table saws, wide belt sanders, CNCs, shapers, edge banders, spray booths
- Workflow: Production-line efficiency with dedicated stations for each task
Dust Collection System
A professional-grade central cyclone dust collector like the Laguna C|Flux 3 or the Laguna P|Flux:3 handles multiple tools running simultaneously.
- Footprint: 48″ x 28″
- Filter: 1 Micron (C|Flux) or HEPA (P|Flux)
- Motor: 3 HP / 220V only
- Port: 8″ Main Inlet; 3 x 4″ Splitter
- Inlet CFM: 2817
- Drum Capacity: 46 Gallon
- Decibel Rating @ 9.8 feet: 88 dB (C|Flux) or 76 dB (P|Flux)
If that’s not enough, get the Laguna X|Flux 5. It is a beast.
- Footprint: 36″ x 38″
- Filter: HEPA
- Motor: 5 HP / 220V only
- Port: 8″ Main Inlet (specify left- or right-side)
- Inlet CFM: 3093
- Drum Capacity: 39 Gallon
- Decibel Rating @ 9.8 feet: 69 dB

This level of dust control features:
- Extensive, well-designed ductwork (overhead and/or underfloor)
- Blast gates and/or automated zoning systems
- Bin sensors and maintenance alerts
- Dedicated finishing room ventilation with explosion-proof fans
- Professional ambient air filtration
- Noise control via sound-insulated enclosures
- Static discharge protection and grounding systems
Woodpeckers Full Throttle 4″ Blast Gates are available inline and surface mount style. ToolsToday carries a wide selection of Dust Collection Accessories.
Finishing Room Ventilation
Finishing areas require specialized ventilation to:
- Prevent dust contamination of wet finishes
- Vent fumes safely outside
- Maintain positive or negative air pressure as needed
Maintenance and Safety
Regular filter cleaning, duct inspection, and bin emptying are mandatory to maintain suction, prevent fires, and ensure safety.
Even in his 3,000 sq. ft. workshop, Matt’s Festool CT Midi Dust Extractor makes a guest appearance. Watch for it!
How to Design an Effective Dust Collection System
1. Start with Your Tools, Not Your Collector
Identify the CFM and port sizes for each tool. Add up the maximum simultaneous CFM needed, and select a collector that meets or exceeds this, accounting for duct losses.
2. Keep Duct Runs Short and Smooth
- Use the largest duct diameter near the collector
- Avoid sharp bends—use long-radius elbows and 45° fittings
- Keep runs as short and direct as possible
- Prefer metal ducting for smooth airflow
3. Use Blast Gates to Control Airflow
Open only the blast gates for the tool(s) in use to maximize suction where you need it.
4. Manage Static Electricity
- Ground metal ductwork
- Run grounding wires inside plastic ducting and flexible hose
5. Filter Fine Dust Effectively
Use HEPA-rated filters and consider adding ambient air cleaners to capture airborne dust.
6. Plan for Growth
Design ductwork with extra branches capped off for future tools.
Pro Tip: Sketch your layout before installation using graph paper or CAD software.
By following these guidelines, you can build a dust collection system tailored to your shop size and workflow—protecting your health and boosting your woodworking efficiency.
Absolutely! Here’s the FAQ section in English along with a meta description tailored for SEO optimization:
❓ Frequently Asked Questions About Dust Collection Systems for Woodshops
1. What’s the difference between a shop-vac and a dust collector?
- Answer: A shop-vac is high-pressure, low-volume—ideal for handheld tools and small spaces. A dust collector is low-pressure, high-volume—designed for stationary tools that produce large amounts of dust.
2. Can I use a HEPA filter in my woodshop?
- Answer: Yes, but be sure it’s a certified True HEPA filter (≥99.97% efficiency at 0.3 microns). HEPA-like filters may not meet the same standards. Even with HEPA, always wear a dust mask.
3. What’s the minimum airflow (CFM) required for common woodworking tools?
- Answer: It varies by tool. For example:
- Table saw: 170 CFM
- Router table: 180 CFM
- Planer: 500 CFM
4. Do I need fixed ductwork in my shop?
- Answer: If your shop is over 1,000 sq ft or has multiple zones, fixed ductwork improves suction and efficiency. It’s essential for Level 3 and Level 4 setups.
5. How do I choose the right dust collection system?
- Answer: Match your system to your shop size and tool usage:
- Level 1: Shop-vac for small garage setups
- Level 2: Compact dust collector for mobile tools
- Level 3: Cyclone system with ductwork
- Level 4: Industrial system for multi-person shops
6. Does duct diameter affect performance?
- Answer: Absolutely. A 6″ duct offers more than double the airflow of a 4″ duct. Using undersized ducts can drastically reduce suction and clog your system.
Great call, Moumen. To enrich your article with authoritative external sources, here are three high-quality links that align perfectly with your content on dust collection systems for woodshops:
🌐 Recommended External Sources
- ToolsToday: Dust Collection Systems for Woodshops – From Garage to Pro 1
A comprehensive guide that mirrors your article structure—breaking down systems by shop size and tool type. Ideal for reinforcing your levels 1–4 framework. - Woodsmith: 5 Dust Control Solutions for Busy Woodshops 2
Offers practical dust control strategies and product suggestions. Great for linking under sections about HEPA filters, ambient air cleaners, or mobile setups. - VilloTech: Ultimate Guide to Woodshop Dust Collection Systems 3
Focuses on health, safety, and system maintenance. Perfect for supporting your points on air quality, filter types, and long-term shop planning.