How to Cut Wall Panels to Specific Dimensions: A DIY Guide

Learning **how to Cut Wall Panels to Specific Dimensions** is a skill every DIY enthusiast should master. Whether you are upgrading your home with acoustic slat wall panels or creating a feature wall with wooden peel and stick planks, precise measurements and clean cuts are essential for a seamless, professional finish.
Many people worry about making mistakes, wasting material, or ending up with uneven panels when starting a wall project. The good news is that with the right approach, the correct tools, and a clear method, cutting panels to the exact sizes you need becomes straightforward. This guide will teach you **how to cut a panel to specific dimensions** with confidence, enabling you to transform your space while ensuring every piece aligns perfectly.
Understanding Your Panel Material
Before you begin learning **how to cut a panel to specific dimensions**, it’s crucial to understand the material you are working with. Different panels require different cutting techniques and tools to achieve a clean, accurate finish.
For example, high-quality **acoustic slat wall panels** made from solid wood and oak veneer are designed for easy DIY installation. These panels will require a fine-tooth saw blade to ensure smooth cuts without splintering the edges. **Peel and stick wood planks**, a popular, lightweight option, come with an adhesive backing, making them easier to handle and cut to size with a sharp utility knife or a fine-tooth saw.
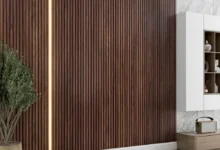


If you are working with plywood or MDF **wall panels**, you will need to take extra care to prevent chipping. Using painter’s tape along the cut line can help protect the edges while you guide your saw gently. Knowing the thickness, finish, and material type of your panel will help you select the correct tools and methods for precise and safe cutting. Taking the time to understand your panel type will prevent frustration and material waste.
Essential Tools for Precision Cutting
When learning **how to cut a panel to specific dimensions**, having the right tools guarantees that your cuts are precise and clean for a frustration-free DIY project.
Here are the essential tools you will need:
- **Tape Measure:** For accurate measurements before marking your panels.
- **Straightedge or Carpenter’s Square:** Helps mark perfectly straight and precise cut lines.
- **Pencil or Fine Marker:** Creates clear, visible marks to follow during the cut.
- **Circular Saw with a Fine-Tooth Blade:** Ideal for cutting acoustic slat panels and other wood panels with minimal chipping.
- **Jigsaw with a Thin Wood Blade:** Useful for specific cuts around outlets or corners.
- **Utility Knife with Extra Blades:** Perfect for scoring and snapping peel and stick boards to exact sizes without damaging the finish.
- **Clamps:** To securely hold panels in place and prevent movement during cuts.
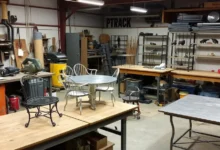
- **Stable Workbench or Sawhorses:** To support your panels while cutting, helping maintain accuracy on longer pieces.
Setting up your workspace with these tools will help you efficiently cut your panels to specific dimensions, ensuring your project looks clean and professionally completed.
How to Cut Wall Panels to Specific Dimensions: Step-by-Step Guide
Now that your tools are ready, it’s time to learn **how to cut a panel to specific dimensions** with confidence. Whether you are working with acoustic slat panels or **peel and stick planks**, these steps will help you make precise, clean cuts every time.
1. Measure Twice
Start by measuring the space where your panel will be installed. Double-check your measurements to avoid errors and material waste. Note the exact dimensions you need for each panel.
2. Mark Your Cut Lines
Using a straightedge or carpenter’s square, mark clear, straight lines on your panel according to your measurements. Use a fine pencil or marker so your lines are easy to see during the cut.
3. Prepare Your Workspace
Set up your workbench or saw horses in a well-lit area. Use clamps to secure your panel in place, preventing any movement during the cut. This helps you maintain precision and safety.
4. Choose the Right Cutting Method
- For **Acoustic Slat Panels** and other wood panels, use a circular saw with a fine-tooth blade for straight cuts.
- For detailed cuts or curves, use a jigsaw with a fine wood blade.
- For **Peel and Stick Boards**, use a sharp utility knife to score along your cut line, and then snap the panel along the score.

5. Cut Slowly and Steadily
Follow your marked line carefully, letting the saw or knife do the work. Rushing can lead to chipped edges or uneven cuts. Maintain a steady movement along the cutting line.
6. Check Your Cut
After the cut, measure the panel again to ensure it matches the desired dimensions. If necessary, lightly sand the edges to smooth any roughness.
7. Clean and Prepare for Installation
Wipe down your panels to remove any dust or debris, ensuring they are clean and ready to be installed seamlessly.
Common Mistakes and How to Avoid Them
Learning **how to cut a panel to specific dimensions** takes practice, but avoiding common mistakes will save you time, money, and frustration on your DIY project.
Inaccurate Measuring
The most common mistake is measuring once and cutting immediately, only to find the panel is too short or uneven. **Always measure at least twice** and mark your lines clearly to guarantee precision.
Using the Wrong Tools
Using a dull blade or the wrong type of saw for your panel can cause splintered edges and rough cuts. For acoustic slats, use a fine-tooth blade. For peel and stick boards, a sharp utility knife is best.
Lack of Panel Support
Cutting panels without proper support can cause them to move or crack. Always use a stable table or sawhorses and secure your panels with clamps before cutting.
Rushing the Cut
Moving too fast can cause shredded edges and inaccurate dimensions. Let your saw or knife move steadily along the cut line to maintain a clean edge.
Forgetting to Test Fit
After cutting, always hold the panel up to the installation area to confirm it matches the required dimensions before permanently installing it. This simple step ensures perfect alignment.
Key Takeaways and Next Steps
Mastering **how to cut a panel to specific dimensions** gives your DIY projects a polished, professional look while saving both time and material. With meticulous measuring, the right tools, and a clear process, you can confidently transform your space using acoustic slat panels or peel and stick boards, ensuring every piece fits perfectly.
If you are ready to upgrade your space, explore the range of easy-to-install wood panels designed for DIY enthusiasts who value quality and design flexibility. From acoustic panels that add warmth and sound absorption to peel and stick boards that simplify your project, you’ll find a solution that aligns with your style and skill level.
Helpful Resources
- Woody Walls Official Site – Explore the best-selling panels and order samples.
- Video: DIY Slat Panel Installation Tutorial – Visual guide for mounting finished panels (Replace with actual video link).
- Guide: How to Use a Circular Saw for Precision – Tips on technique for straight, clean cuts.