Beginner Guide for CNC Programs (for Sketchup users)
That’s a great idea! Many SketchUp users find the transition to CNC programming a bit daunting, but it’s definitely achievable. Here’s a Guide for CNC Program to help you get started:
Beginner’s Guide for CNC Program for SketchUp Users
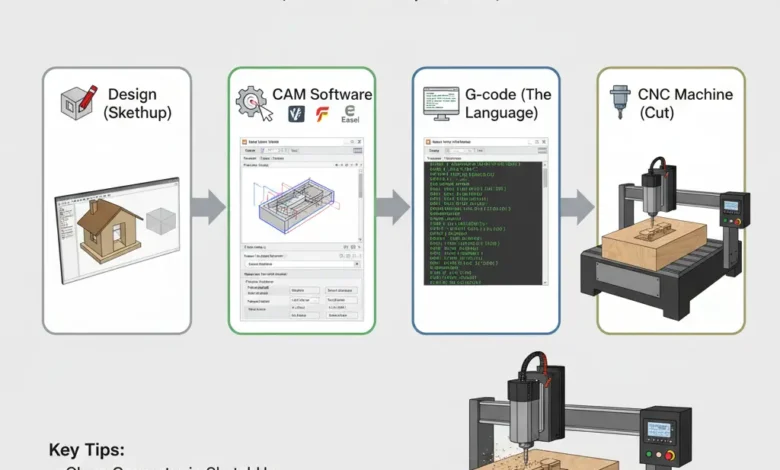
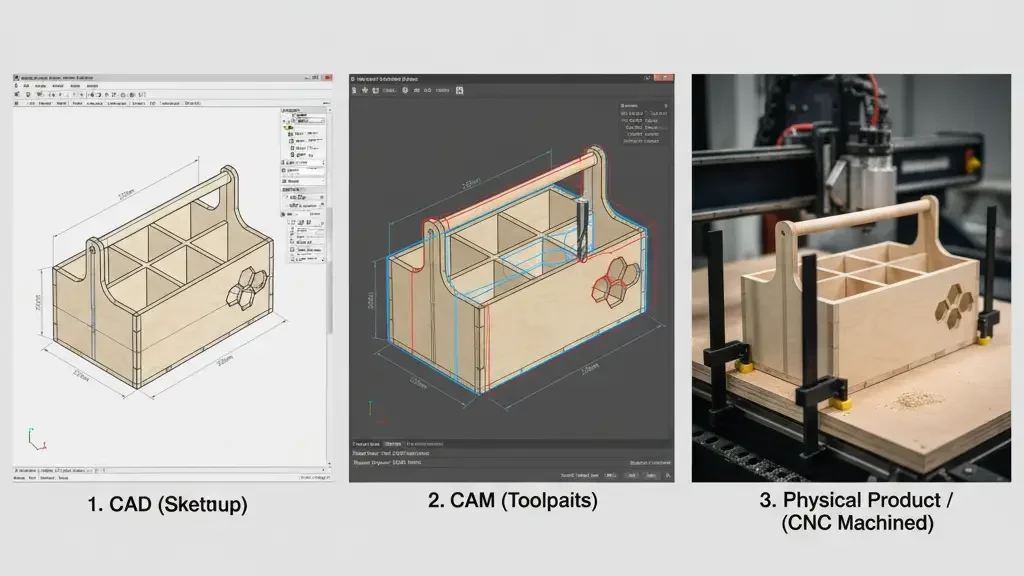
1. Understanding the CNC Workflow
Before diving into the specifics, it’s crucial to understand the overall process. Think of it as a journey from your design idea to a physical object.
- Design (Sketchup): This is where you create your 3D model.
- CAM (Computer-Aided Manufacturing): This is the bridge between your design and the CNC machine. Here, you define tool paths and generate G-code.
- G-code: This is the language your CNC machine understands. It’s a series of commands that tell the machine where to move, how fast, and what to do (e.g., turn on the spindle).
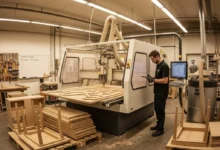
- CNC Machine: The machine executes the G-code to cut your material.
2. Key Concepts in CNC
Even though you’re starting from SketchUp, you’ll encounter new terminology. Don’t worry, we’ll break down the important ones.
- Axis: CNC machines typically operate on X, Y, and Z axes.
- X-axis: Left to right movement.
- Y-axis: Front to back movement.
- Z-axis: Up and down movement (plunge depth).
- Spindle: The rotating part of the machine that holds the cutting tool.
- Tool Path: The specific route the cutting tool takes to remove material.
- Feeds and Speeds:
- Feed Rate: How fast the tool moves through the material (e.g., inches per minute, mm per minute).
- Spindle Speed (RPM): How fast the spindle rotates (revolutions per minute).
- End Mill/Router Bit: The actual cutting tool. They come in various shapes and sizes for different operations.
- Workholding: How you secure your material to the CNC bed. This is critical for accuracy and safety.
3. From SketchUp to G-code: The CAM Software
Sketchup is excellent for 3D modeling, but it doesn’t generate G-code directly. You need CAM software. Here are some popular options often used by hobbyists and small shops, some of which have SketchUp integration or are good companions:

- VCarve Desktop/Pro (Vectric): Very popular, user-friendly, and powerful. Excellent for 2D and 2.5D cutting.
- Fusion 360 (Autodesk): A comprehensive CAD/CAM package. It has a steeper learning curve but offers powerful 3D machining capabilities.
- Easel (Inventables): If you have an Inventables X-Carve or Carvey, Easel is very intuitive and web-based.
- Carbide Create (Carbide 3D): Similar to Easel, designed for Shapeoko and Nomad machines.
- Plugins for SketchUp: While less common for full CAM, some plugins like “Phlatboyz PhlatCAM” can help with basic 2.5D G-code generation directly from SketchUp for specific applications.
Recommended Workflow (General):
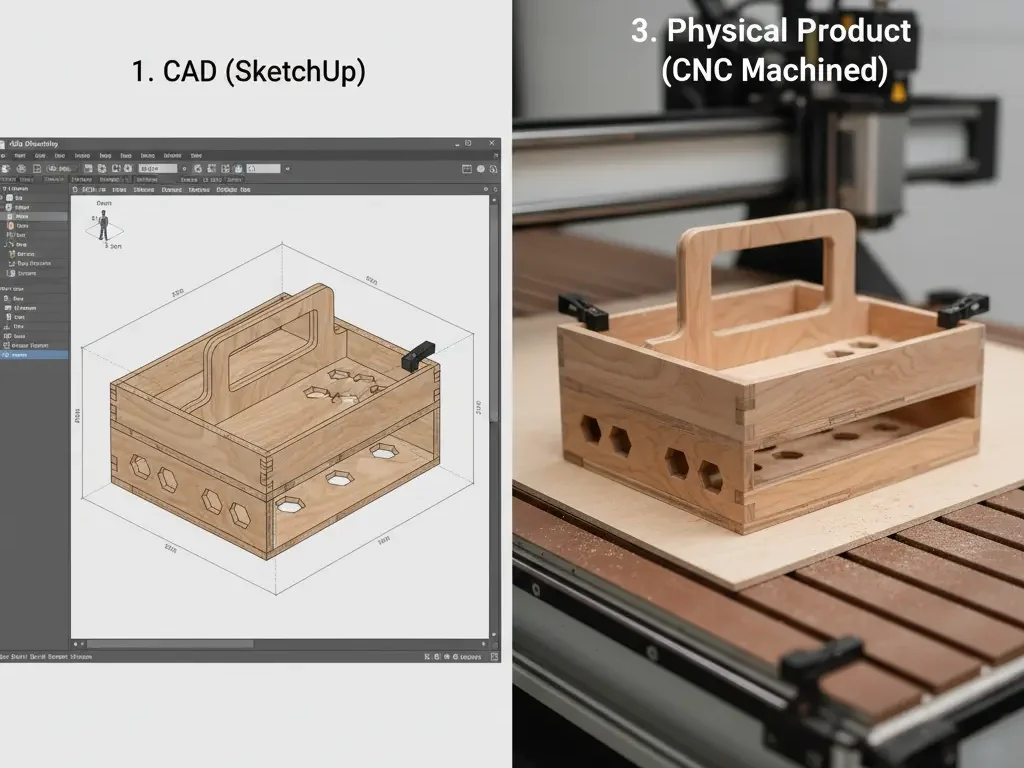
- Design in SketchUp: Create your 3D model with accuracy. Make sure all faces are correctly oriented (blue back faces hidden). For CNC, you’ll often focus on 2D profiles or simple 3D shapes.
- Export from SketchUp:
- For 2D/2.5D parts: Export as a DXF (Drawing Exchange Format) or SVG (Scalable Vector Graphics). Many CAM programs can import these. You might need a SketchUp extension for better DXF export.
- For 3D parts: Export as an STL (Stereolithography) file. This is standard for 3D machining.
- Import into CAM Software: Open your chosen CAM software and import the DXF, SVG, or STL file.
- Define Material and Origin:
- Material Size: Specify the dimensions of your raw material.
- Work Zero (Origin): This is the starting point (X0, Y0, Z0) for your machine. It could be a corner of your material, the center, or the machine’s home position.
- Create Tool Paths: This is where you tell the CAM software what you want the machine to do.
- Pocketing: Removing material from a defined area to a certain depth.
- Profiling (Cutout): Cutting completely around the perimeter of a shape.
- Drilling: Creating holes.
- V-Carving: Creating carved letters or designs with a V-bit.
- 3D Carving: For complex 3D shapes (requires an STL import).
- Select Tools, Feeds, and Speeds: Choose the appropriate end mill/router bit for each operation and set the feed rate and spindle speed. This is crucial for good results and tool life. Consult material specific charts and your tool manufacturer’s recommendations.
- Simulate Tool Paths: Most CAM software has a simulation feature. Always simulate your tool paths to check for errors, collisions, and ensure the cut looks as intended.
- Generate G-code: Once you’re happy with the simulation, generate the G-code. You’ll need to select the correct “post-processor” for your specific CNC machine and controller. This ensures the G-code is formatted correctly.
- Transfer G-code to CNC Machine: Load the G-code file onto your CNC machine’s controller (usually via USB, Ethernet, or SD card).
- Set Up Machine and Run:
- Secure your material.
- Install the correct cutting tool.
- Manually move the machine’s spindle to your defined work zero and set it.
- Perform a dry run (running the program with the spindle off, slightly above the material) if possible, especially for new programs.
- Start the program and stay vigilant! Be ready to hit the emergency stop button if anything goes wrong.
4. SketchUp Specific Tips for CNC
- Clean Geometry: CNC machines don’t like messy SketchUp models.
- No stray edges or faces.
- Groups and Components: Use them extensively to organize your model.
- Solid Tools: If you have SketchUp Pro, use the Solid Tools to ensure your objects are truly solid for STL export.
- Face Orientation: Make sure all blue back faces are hidden. CNC software expects consistent face orientation.
- 2D for 2.5D: For many common CNC tasks (cutting out parts, pockets, engravings), you’ll essentially be working with 2D profiles even in a 3D program like SketchUp. Focus on creating clean, coplanar edges for export.
- Scale: Ensure your SketchUp model is in the correct units (mm or inches) that your CAM software and CNC machine are expecting.
- Extensions: Explore extensions like “DXF Export” or “STL Exporter” if the built-in options aren’t sufficient for your CAM software.
5. Learning Resources
- YouTube: Search for tutorials specific to your chosen CAM software and CNC machine.
- Software Documentation: Read the manuals and guides for your CAM software.
- Online Forums: Join CNC and CAM software communities. They are invaluable for troubleshooting and learning.
- Start Simple: Don’t try to build a complex project right away. Start with cutting a simple square, then a circle, then pockets, etc.
- Practice with Foam or MDF: These materials are inexpensive and easy to cut, allowing you to learn without wasting expensive stock.
usly learning about CNC programming and exploring different software will empower you to bring virtually any design to life.
🧠 Final Thoughts
Transitioning from SketchUp to CNC programming may seem intimidating at first, but with the right tools and workflow, it becomes a powerful creative process. Whether you’re crafting simple 2D cutouts or exploring complex 3D carvings, understanding the connection between design, CAM software, and CNC execution is key.
Start small, experiment often, and don’t be afraid to make mistakes—they’re part of the learning curve. With practice, you’ll be able to turn your digital designs into precise, tangible creations that bring your ideas to life.
🔧 Ready to carve your first masterpiece? Your CNC journey starts now.
❓ Frequently Asked Questions (FAQ) About CNC Programs for SketchUp Users
1. What’s the difference between SketchUp, CAM, and CNC?
Answer:
- SketchUp is a 3D modeling software used to design objects.
- CAM (Computer-Aided Manufacturing) translates those designs into tool paths and G-code.
- CNC (Computer Numerical Control) machines execute the G-code to physically cut or carve materials.
🔗 Learn more from Autodesk’s CAD/CAM/CNC overview
2. Can SketchUp generate G-code directly?
Answer:
No, SketchUp doesn’t generate G-code on its own. You’ll need a CAM software like:
- Fusion 360
- VCarve
- Easel
- Carbide Create
🔗 Explore top CAM software for beginners on CNCCookbook
3. What’s the best way to export SketchUp designs to CAM software?
Answer:
- For 2D/2.5D designs: Export as DXF or SVG.
- For 3D designs: Export as STL.
🔗 SketchUp’s official STL export guide
4. What are the key CNC terms I should know?
Answer:
- Axes (X/Y/Z): Directional movement
- Spindle: Rotating cutting tool
- Tool Path: Route the tool follows
- Feeds and Speeds: Cutting speed and rotation rate
- Workholding: Securing material to the CNC bed
🔗 Glossary of CNC terms from Avid CNC
5. How do I choose the right CAM software for my project?
Answer:
It depends on your machine, experience level, and project complexity.
- Fusion 360 is great for advanced users.
- Easel and Carbide Create are ideal for beginners.
🔗 Makezine’s CNC software guide